Database Testing Concept

What is Database Testing:
Database testing is a process of working with data stored in database. Data is stored in tables which is considered as an object in database. Database may have other objects like Views, functions, stored procedures etc. Now-a-days, the Applications are becoming more complex with new technologies and platforms. In order to ensure the quality and security of data and validate the data effectively, we need to learn database testing.

Database testing mainly includes the following:
-> Database Objects (Table, Views, Stored Procedures)
-> Data Accuracy & Validity (Field size validation)
-> Data Integrity (Check constraints, insert, delete, update)
-> Data Transaction Consistency and Concurrency (States & Locks)
-> Data Migration (Import, Export)
-> Performance related to database (Indices, number of triggers and procedures)
-> Security related to database – Data Accessing ( unauthorized access)

How to Test Database?
The general test process for Database testing is very similar to any other application. It requires the tester to expertise in checking tables, writing queries and procedures. Testing can be performed in web application or desktop and database can be used in the application like SQL or Oracle. Below are some of the points on how to test database.
-> List all database specific requirements
-> Create test cases/scenarios for each requirement
-> Figure out the tables used for the application and try to write all queries for the database tables to execute
-> Test all the tables carefully for the data added/updated/deleted
-> If database is more complex due to business logic, then tester can get the queries from developer to test the appropriate functionality
-> Validate data according to the expected results
-> Report the findings to the corresponding stakeholders

Why should we test a database ?
Below, are some reasons why database records need to be validated

1) Data Mapping: In the software applications, data often travels back and forth from the User Interface to the backend database and vice versa. So, we need to check whether the fields in the UI/Front end forms are mapped correctly with the corresponding DB table.  Generally, this mapping information is defined in the requirements document itself. Whenever a certain action is performed in the front end of an application, a corresponding action(Create, Retrieve, Update and delete) gets invoked at the back end. A tester needs to check if the right action is invoked and the invoked action is successful or not.

2) ACID properties validation:  ACID property refers to atomicity, consistency, isolation and durability. Every transaction in DB has to adhere to these four properties.
Atomicity: means the ability of the database to make sure that a transaction either fails or passes. Even if a single part of transaction fails, then it means the whole transaction has failed. This is called the ‘All-or nothing’ rule.
Consistency: It ensures that the database remains in a consistent state before the start of the transaction and after the transaction is over (whether successful or not). A transaction will always result in a valid state of the DB
Isolation: It ensures that if a transaction is going on, then any other operations cannot access or see the data in an intermediate state.If there are multiple transactions and they all are executed at once, the result/state of the DB should be the same as if they were executed one after the other.
Durability: Durability ensures that once a transaction is done and committed, it will persist, and not be undone. It should survive the  system failure, power loss or any crash.
Taking Full page screenshot of Web page using Selenium Webdriver

While executing a testcase, if the testcase fails, then we need to take a screenshot of the page for error reporting. This can also be done by using Selenium Webdriver.
We can use the following syntax  for capturing and saving full page screenshot.
File screenshot = ((TakesScreenshot)driver).getScreenshotAs(OutputType.FILE);

Then it can be stored in our local drive using the following syntax
FileUtils.copyFile(screenshot, new File(“D:\\screenshot.png”));

Now, here is the small example of webdriver script by which we can capture the full page screenshot.

package Screenshot;
import java.io.File;
import java.util.concurrent.TimeUnit;

import org.apache.commons.io.FileUtils;
import org.openqa.selenium.By;
import org.openqa.selenium.OutputType;
import org.openqa.selenium.TakesScreenshot;
import org.openqa.selenium.WebDriver;
import org.openqa.selenium.firefox.FirefoxDriver;

public class FullPage_Screenshot {

    public static void main(String[] args) throws Exception {

        WebDriver driver = new FirefoxDriver(); 
         
        try{
            driver.get("http://google.co.in"); 
            driver.manage().timeouts().implicitlyWait(20, TimeUnit.SECONDS);
            driver.manage().window().maximize();
            
            //driver.findElement(By.xpath("//input[@id='gbqfq']")).sendKeys("test");
            driver.findElement(By.xpath("//input[@id='gbqfq1']")).sendKeys("test");
            System.out.println("Entered data in textfield");    
        }   
        catch (Exception e) 
        {  
            File scrFile = ((TakesScreenshot)driver).getScreenshotAs(OutputType.FILE);  
            FileUtils.copyFile(scrFile, new File("D:\\screenShot1.png"));
            System.out.println("Screenshot is captured for failed testcase");
        }  
    }  
}

// driver.findElement(By.xpath(“//input[@id=’gbqfq’]”)).sendKeys(“test”);

If we execute this statement, then we can enter data into the text field and the testcase will pass. So, it will not take the screenshot.

So, I  have commented out the correct statement so that the testcase will fail and screenshot will be captured.

Hope this will help you 🙂

Perform Drag and Drop of Elements using Selenium Webdriver

In this post, i will give a simple example of script which will perform drag and drop operation of elements

Lets take an example of the site ‘http://jqueryui.com/droppable’
Here we can see 2 elements. One is draggable which is called the Source element. It will be dragged from one location and dropped in another location which is called Target.

There are different ways to write the script for drag and drop. I will describe few ways i have tried.

1st way:
act.dragAndDrop(Source, Target).build().perform();

2nd way:
act.clickAndHold(From).build().perform();
act.moveToElement(To).build().perform();
act.release(To).build().perform();

3rd way:
act.dragAndDropBy(Source, xoffset, yoffset).perform();

Write the following code into Eclipse IDE and then run the script.

package JqueryPackage;
import java.io.IOException;
import java.util.concurrent.TimeUnit;
import org.openqa.selenium.By;
import org.openqa.selenium.WebDriver;
import org.openqa.selenium.WebElement;
import org.openqa.selenium.firefox.FirefoxDriver;
import org.openqa.selenium.interactions.Actions;

public class JqueryElements {

    public static void main(String[] args) {

    WebDriver driver = new FirefoxDriver();
    driver.manage().timeouts().implicitlyWait(10, TimeUnit.SECONDS);
    driver.get(“http://jqueryui.com/droppable/#default”);
    driver.manage().window().maximize();

    Actions act = new Actions(driver);

    // Script for dragging an element and dropping it in another place
    WebElement iFrame = driver.findElement(By.tagName(“iframe”));
    System.out.println(iFrame.getSize());
    driver.switchTo().frame(iFrame);

    WebElement From = driver.findElement(By.id(“draggable”));
    System.out.println(From.getLocation());

    WebElement To = driver.findElement(By.id(“droppable”));
    System.out.println(To.getLocation());

    act.dragAndDrop(From, To).build().perform();

    }
}

We can replace the last line by any one of the following codes to perform the drag and drop.

act.clickAndHold(From).build().perform();
act.moveToElement(To).build().perform();
act.release(To).build().perform();

OR

act.dragAndDropBy(From, 140, 18).perform();

Here 140 and 8 are the x and y offset of the target element.
We can find the location of the element by using the getLocation() method

Hope this will help 🙂

Types of Locators to identify the WebElements

A web page consists of set of different web elements. We need to know what are the different elements on a web page and then how to locate the web elements.

Here are some common web elements we encounter most of the time while automating the web page.
Text box
Drop-down List
Checkbox
Radio button
Hyperlink
TextArea
Image
Button
Window

An element locator is simply a method for finding an element on the web page.
We can use the following locators based on priority to identify the elements on the web page.
– Locating By Id
– Locating By Name
– Locating By Class
– Locating Hyperlinks by LinkText
– Locating By Xpath
– Locating By CSS

Steps to find the element locator for the web element:
-> Search for the locator which will find the element by ID or proceed to the next step.
-> Search for the locator which will find the element by Name or proceed to the next step.
-> Search for the locator which will find the element by Class or proceed to the next step.
-> Search for the locator which will find the element by LinkText or proceed to the next step.
-> Search for the locator which will find the element by XPath or proceed to the next step.
-> Search for the locator which will find the element by CSS or proceed to the next step.

While following the above steps to locate elements, a question may come to our mind that why there are so many types of locators instead of any one to identify the elements.

Element Locator is a way of finding the HTML element on the web page. Every HTML element on the page we are testing with Selenium will have a unique Name or ID that we can always refer to. But, usually we are doing black box testing and have no access to the developer’s code and there is difficulty in finding the correct elements due to absence of unique identifier like Name or ID. Also, there are some web applications which recreates the element ID each time dynamically when the application is run. In this case, it is very difficult to handle if we depend on only one type of locator.

Some basic syntax for different locators:
1. By ID:
driver.findElement(By.id(“element id”))

2. By NAME:
driver.findElement(By.name(“element name”))

3. By CLASS:
driver.findElement(By.className(“element class”))

4. By Link:
driver.findElement(By.link(“link text”))

5. By XPath:
driver.findElement(By.xpath(“xpath expression”))

6. By CSS Selector:
driver.findElement(By.cssSelector(“css selector”))

These locators can be identified by using Firebug and Firepath plugins in Firefox Browser

Create and Execute your first Webdriver script using Eclipse

I have already posted in my last blog how to install and Configure Webdriver using Eclipse and Java. Now, its time to write the Java code for your testcase of the web application. I will give one simple example of creating a webdriver script with explanation in the form of comments.

For this, we need to write the following code into Eclipse.

package MyPackage;
import org.openqa.selenium.WebDriver;
import org.openqa.selenium.firefox.FirefoxDriver;

public class MyClass {

    public static void main(String[] args) {
        WebDriver driver = new FirefoxDriver();  //Create a new instance of Firefox Browser
        driver.get("https://www.google.co.in/"); //Open the URL in firefox browser
        driver.manage().window().maximize(); //Maximize the Browser window
        String str = driver.getCurrentUrl(); //Get the current page URL and store the value in variable 'str'
        System.out.println("The current URL is " + str); //Print the value of variable in the console
    }
}

Now, click on the Run Menu of the Eclipse window to execute the script.

As an output, It will open the firefox browser , maximize the browser window, get the current page URL and print the value in the Console.

Setup and configure Selenium Webdriver With Eclipse and Java

In this post, we will discuss how to setup and configure Selenium Webdriver using Eclipse IDE and Java.

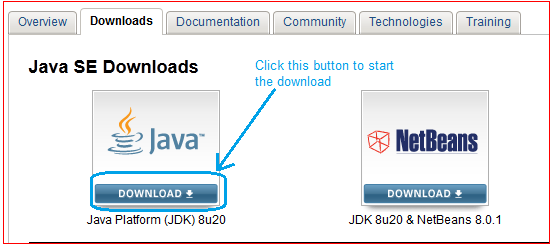
Step – 1: In the first step, download and install JDK (Java Development Kit) in your system

For downloading Java, you need to visit the following link http://www.oracle.com/technetwork/java/javase/downloads/index.html

Install_JDK


Step – 2: In the second step, download and install Eclipse from the link below

http://www.eclipse.org/downloads/

Eclipse_IDE


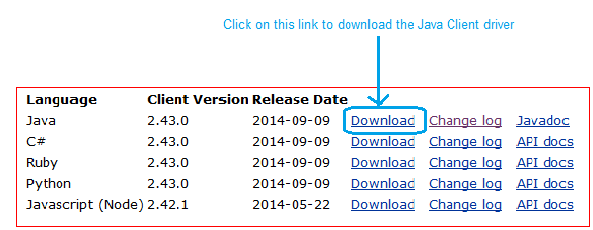
Step – 3: Download the Selenium Java Client Driver from

http://docs.seleniumhq.org/download/

Java_Client_Driver

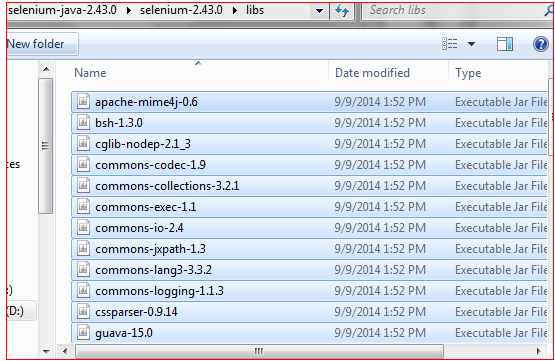
Click on the Download link for Java language, you will get a ZIP file named “selenium-2.43.0.zip”. Then extract the contents of this ZIP file on any location say “D:\selenium-2.43.0\”. The unzipped folder contains the ‘libs’ folder , 2 jar files and Change Log.


Step – 4: Configure Eclipse to work with Webdriver

Double click on ‘Eclipse.exe’ to launch eclipse

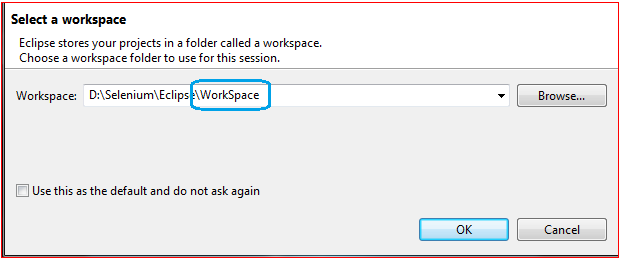
When asked to select for a workspace, just accept the default location. Or, you can change the location

Launch_Eclipse

Create a new project through File → New → Java Project. Name the project as “MyProject”.

Right-click on the newly created project and select New > Package, and name that package as “MyPackage”.

Create a new Java class under MyPackage by right-clicking on it and then selecting New > Class, and then name it as “MyClass”. Your Eclipse IDE should look like the image below.

New_Project

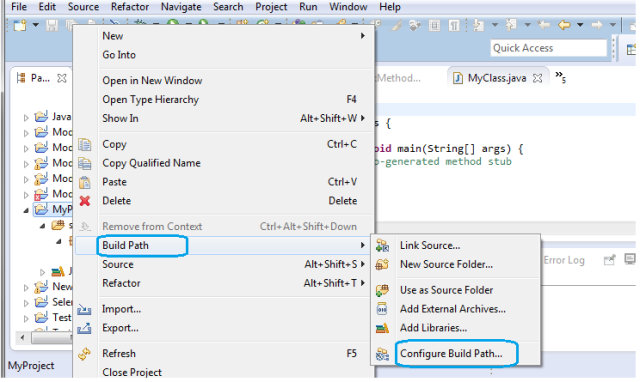
Right-click on MyProject and select “Build Path” and then “Configure Build Path”.

Build_Path

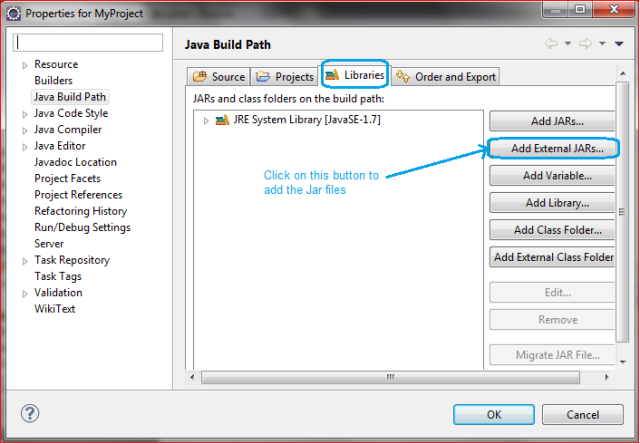
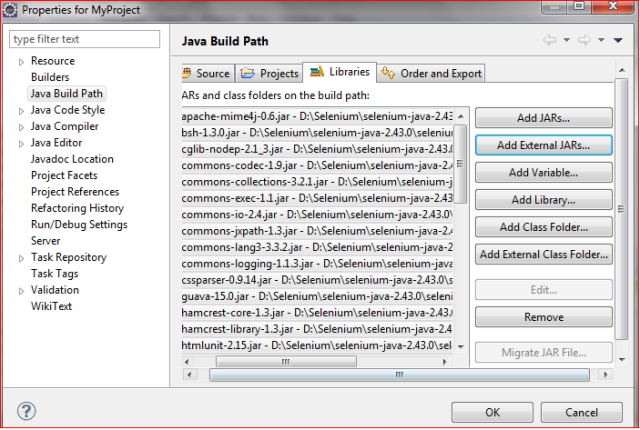
This will open the Libraries tab in Properties dialog. Then on click “Add External JARs..”

Add_Jar_Files

Navigate to D:\selenium-2.43.0\ (or any other location where you saved the extracted contents of “selenium-2.43.0.zip”).

Add all the JAR files inside and outside the “libs” folder.

These are the Jar files present outside the Libs folder

Lib_Outside


These are the Jar files present inside the Libs folder

Lib_Inside


Then your Properties dialog should look similar to the image below.

Properties_Jar_Files

Finally, click on the OK button and we are done with importing Selenium libraries into our project.  Now, we are ready to write our test in Eclipse and run it in WebDriver. I will post about the first Webdriver script using Eclipse in my next blog.


How Much Java is needed to learn for writing Selenium Script

Selenium is a web automation tool which enables us to automate the web browsers. Selenium Webdriver supports different languages like Java, python, c#, Ruby or other. So we can choose any language to write our script. If we want to learn Selenium, we need to have basic knowledge about one programming language – don’t have to be an expert.

Here I have listed down some of the Java essentials which we need to learn before jumping to Selenium Scripting

  • OOPS concept – Class, Objects, Abstraction, Polymorphism, Inheritance and Encapsulation
  • Programming essentials – Object Instances, variables, method overloading/overriding concepts and packages, Constructors,Abstract Class, Interface etc..
  • Control Statements – If statements, While, do-While, Switch – This will help us in writing the scripts for multiple scenario statements and decision making scenarios.
  • Looping statements – This can be used to execute the same statements multiple times for ex; iterating through a large table to find a record and logging into 5 different accounts using same method.
  • Arrays Concepts – We don’t want to keep writing variables all over our test scripts. For that we need to create a placeholder for similar type of variables. So, concept of Array allows us to string related variables together into one single variable that’s easy to use.
  • Threads and Multithreading Concepts – Multithreaded program contains multiple activities that can run concurrently and each part can handle different task at the same time making optimal use of the available resources. That will help us in achieving better performance.
  • Java Collections Framework – This framework is provided in the java.util package. Objects can be stored, retrieved, and manipulated as elements of collections. Collections can be used in various scenarios like Storing phone numbers, Employee names database etc. They are basically used to group multiple elements into a single unit.
  • File Streams – This will be helpful in externalization of data through CSV, Excel or Java Properties file.
  • Exception Handling – When an error occurs in a Java program it usually results in an exception being thrown. Java exception handling enables the Java applications to handle the errors. Exception handling is a very important aspect of writing robust Java applications or components.

There are many things in Java. But we need these basic things before jumping to Selenium scripting.

Regards,
Pratima Rout
QA Engg., Mindfire Solutions